


Description
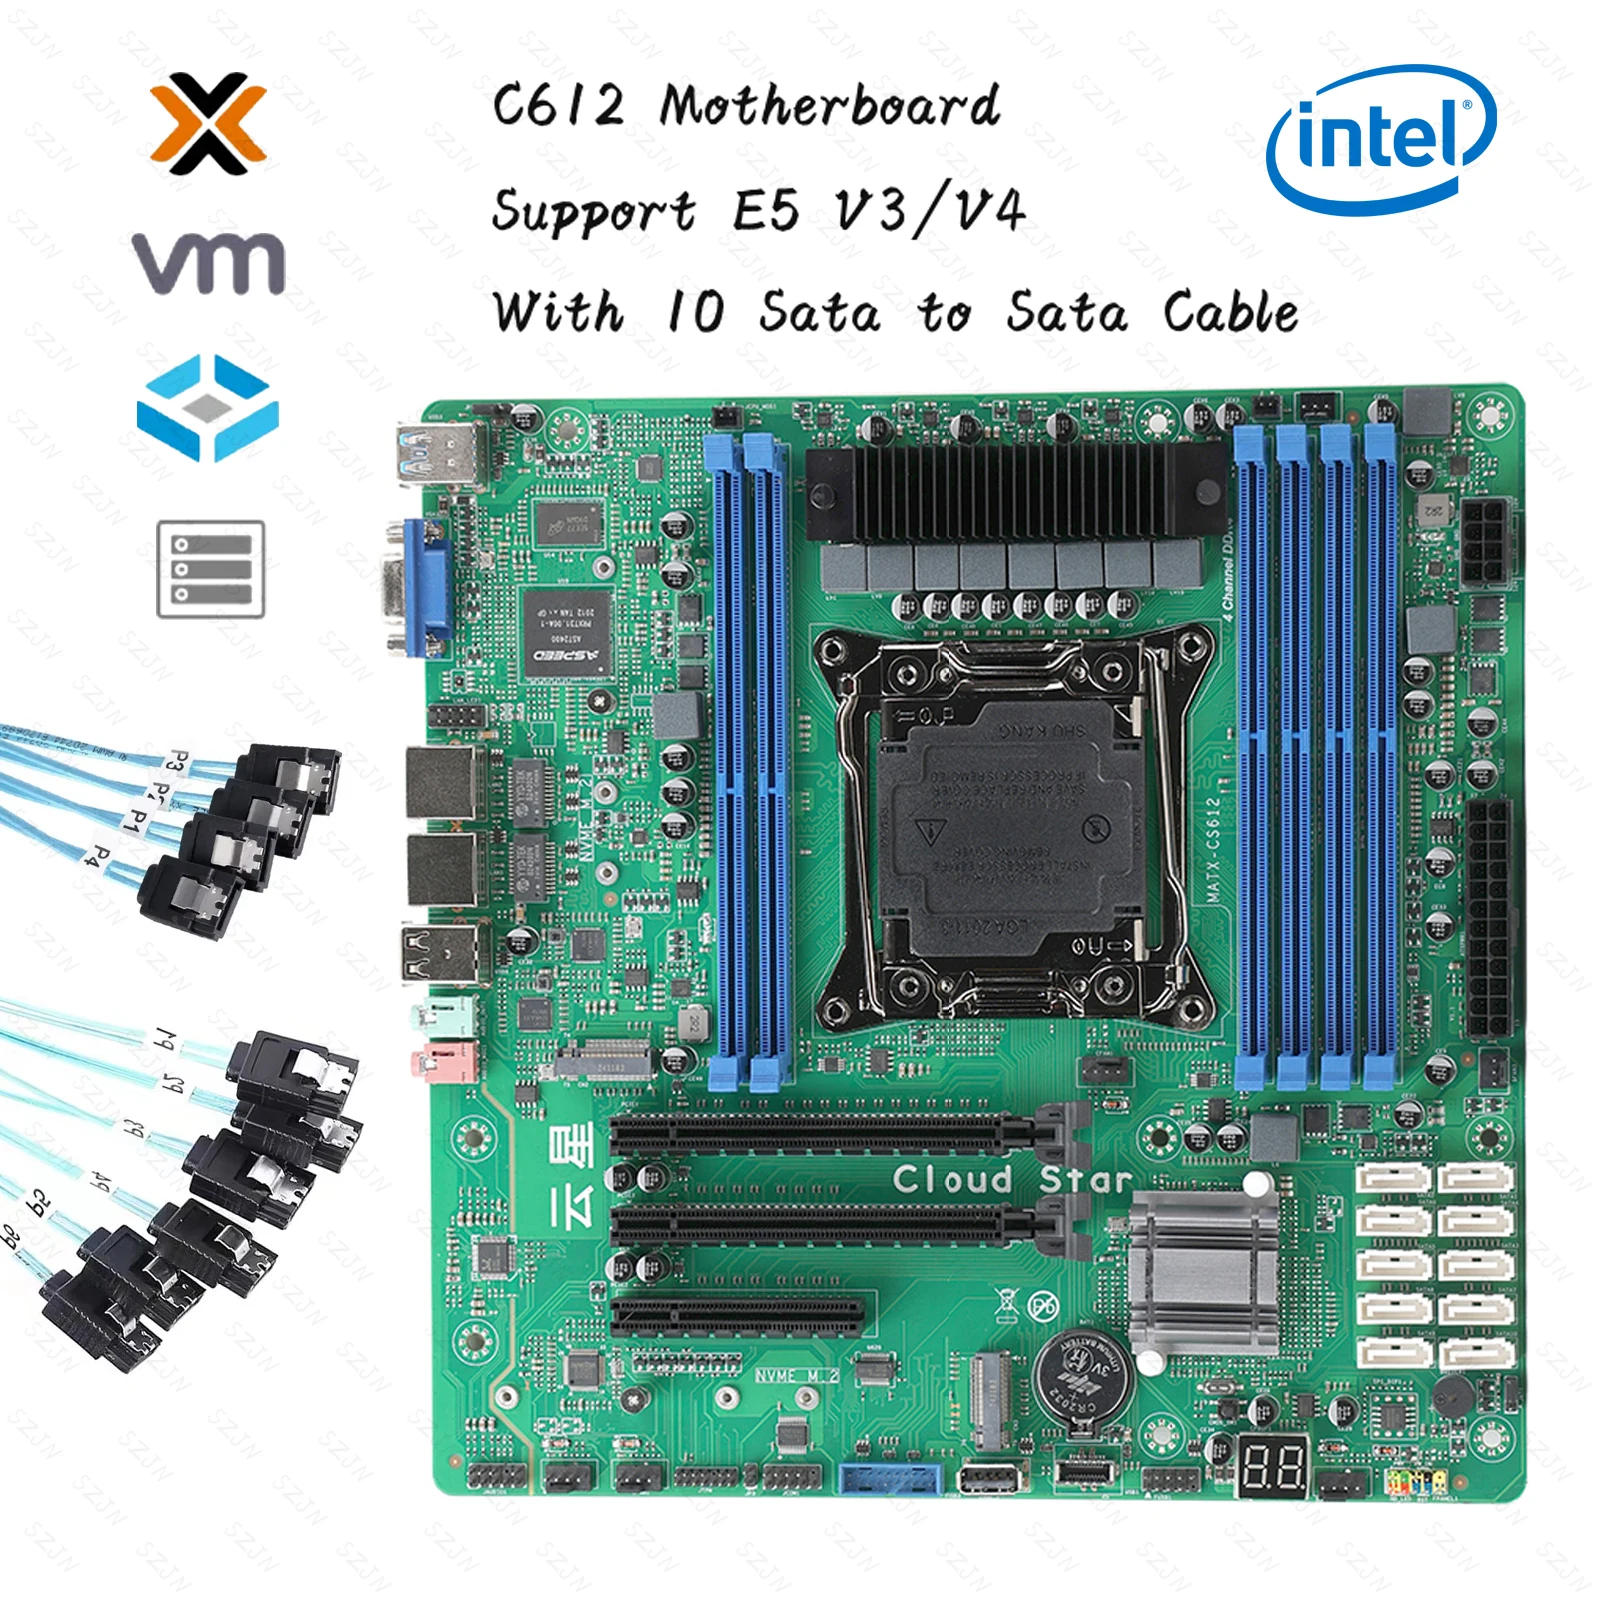
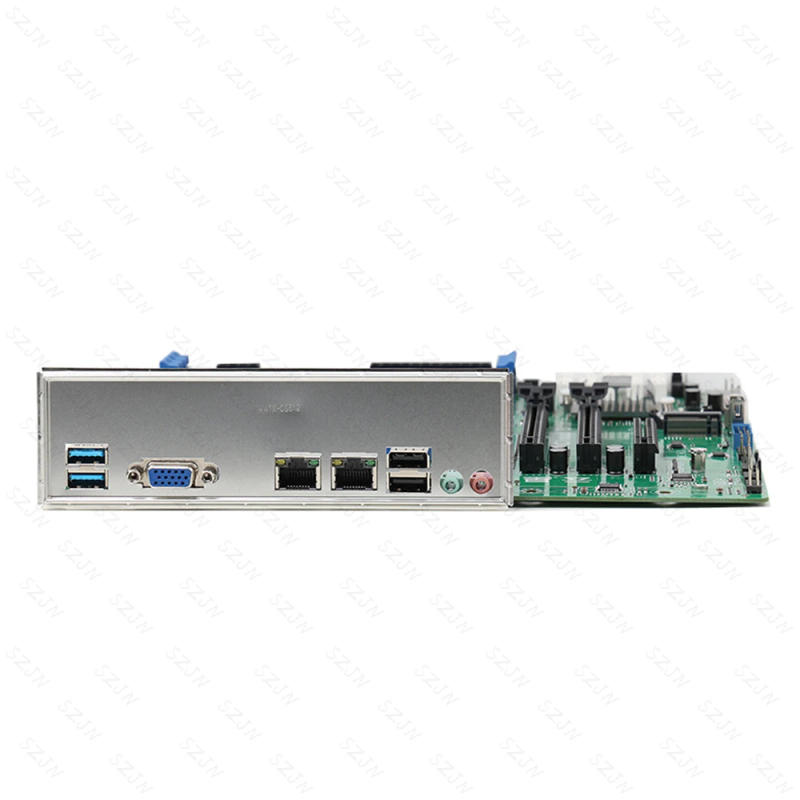
If you come upon any issues while utilizing the product, please depart a message for the merchant products endure testing earlier than shipment We can provide testing videos service provider bought hundreds of motherboards of this model and has trip in dealing with assorted conditions you stumble upon any problems, please do not apply for money back immediately starting up a refund dispute with none high quality disorders with the product will result in the merchant complaining to the customer on the Buydo platform About the sorting of memory: because the motherboard has its own self-test program, the reminiscence ought to be inserted into the key channel reminiscence earlier than the self-test program, the order of priority is 8, 6, 2, 1, 3, four Enable SR-IOV Support on the mainboard Virtualization Settings: Go to Advanced select PCI Subsystem Settings choose SR-IOV Suppor select Enadled to open it (press f10 to save lots of the Settings) Enable virtualized VT-D Settings: Go to IntelRCSentup and choose II0 Configurtion, select Intel VT for Directed I/0(VT-D) and select VTd Azalaea CVP 0ptimizations Select Enable to open (press f10 to save lots of the Settings) PCIE slot cut up setting, Enter IntelRCSentup to select II0 Configurtion to pick IIO0 Configurtion to choose I0U1 (II0 PCIE Port3) (this is the 1st PCIE X16 slot channel is X16) to set four modes X8X8, X8X4X4, X4X4X8, X4x4x4 (Split operate ought to be chosen in keeping with their own enlargement accessories to separate Settings) Select I0U0 (II0 PCIE Port2) (this is to set the second one PCIEx16 slot channel X8 and the 1/3 PCIEx8 slot channel X8) The moment and 0.33 pcie slots can only set one mode X4X4X4X4 splitting function should be selected in line with their very own growth accessories), the second one and 1/3 slots set x4x4x4x4 will default every single slot can cut up 2 x4 channel alerts out (remember to press f10 to save lots of the Settings) CPU Turbo frequency operate on and rancid Settings: Enter IntelRCSentup to choose Advanced Power Managemnt Conf iguration to select CPU P State Control to choose Turbo Mode (if Enable is enabled, Disable) This function can be used on demand (press f10 to avoid wasting the Settings) Sata scorching swap Settings at the mainboard (About the bios sata port Description The first PCH sSATAConfiguration choice is to configure ports 7-10 SATA The moment PCH SATA Configuration possibility is to set the 1-6 sata ports: Enter IntelRCSentup Select PCH configuration Select PCH sSATA Configuration (7-10 sata ports) and PCH SATA Configuration (1-6sata ports) to find all SATA ports If the Hot Plug choice of the port is Enabled, the new plug function is enabled (press f10 to save the Settings) Press delete or esc over and over when the mainboard enters the bios and begins To input the USB flash drive, press f11 over and over Enable IPV4 and IPV6 Settings: Go to Advanced, choose Network Stack Configurtion, choose Nework Stack, select Enabled, and select Ipv4 PXE Support and Ipv6 PXE Support Enable is Enabled (press f10 to save lots of the Settings) Bios network wake up enable Settings: Enter Advanced, select ACPI Settings, choose Lock Legacy Resources, select Enadled to open (remember to press f10 to save the Settings) Cooling fan speed Settings: Enter Advanced select Hardware Monitor choose Cpu SmartFan management (this is to set the cpu fan speed), If it is best to regulate the chassis fans, select SYS Smart fan Control (Chassis fan recommendations have several needs to be adjusted Select PWM Manually Mode for these velocity management options, and then input the price of the speed that you simply deserve to adjust The default pace price is 128, the very best is 255, the lowest is 0, in line with the use of the value of the rate can be adjusted (remember to press f10 to save) The mainboard allows the environment of Intel independent graphics card (before enabling the setting, the Intel graphics card needs to be inserted into the pciex16 slot at the mainboard first, after which linked to the VGA interface to allow the setting) Enter Advanced and select PCI Subsystem Settings First, choose Above 4G Decoding and choose Enadled to open, after which choose Enadled to open when opening Re-size BAR Support After these two are turned on, go back to the Advanced option and select CSM Configurtion, select CMS Support and choose Disabled to show off (remember to press f10 to avoid wasting the Settings) and straight use the Intel autonomous graphics card The main points of the MATX-CS612 mainboard are as follows: Supports LGA2011 XEON cpus Supports a four-channel 2133 MHZ DDR4 ECC, and 2400MHz ERCC reminiscence with a maximum of 192GB and a single slot with a most of 32 GB The reveal helps VGA helps two 2 networks; Supports two M interfaces (NVME only) helps 9 USB ports and one TYPE-E port Supports two PCIE X16 slots and one PCIE X8 slot Supports 10 SATA 3 ports Built-in one RS232 serial port Support -10~60 degrees extensive temperature work; built-in clean CMOS button, troubleshooting and fixing issues faster; Motherboard size: 244mm * 244mm CPU: Supports LGA2011 XEON series CPU Memory: Six 288Pin DDR4 DIMM slots Each memory supports a maximum of 32GB Expansion slot:1 x PCIE X8 slot2 x PCIE X16 slots (where PCIE3 is the X8 signal)2 x M SSD Backplane interface: 1 x VGA demonstrate port 2 x USB3 2 x USB2 2 x audio interface (Line Out/MIC-IN) 2 x RJ45 port Built-in interface: 10 x SATA ports 1 x 9-Pin Front Panel Switch Pin (FPANEL) 1 x 4Pin CPU Cooling Fan (CFAN1) three x 4Pin System Cooling fan (SFAN1) 2 x 3Pin System Cooling fan (SFAN1) 2 x 2Pin System Cooling fan (SFAN1) 1 x Built-in COM interface 1 x FUSB front port (can be transferred to 2 USB2 ports) 1 x FUSB entrance port (can be converted to 2 USB3 ports) 1 x USB port (can be switched over to one USB2 port) 1 x TYPE-E interface 1 x TPM port 1 x 9Pin Built-in Audio interface (F_AUDIO) 1 x 8pin ATX interface 1 x 24pin ATX interface 1 x 9Pin LAN LED Display VGA exhibit is supported Network Two Intel I226V Gigabit network adapters Audio Realtek ALC897, supports Line-Out & Line-InI/O chip NUVOTON NCT5585DSupply 24Pin+8Pin ATX strength supply Operating formulation Windows 10, Windows 11, or Linux Use good judgment safely1, before utilizing this product, please make sure you learn the product handbook carefully;2, for the board that is not able to be installed, it's going to be saved within the anti-static protection bag;3, earlier than disposing of the cardboard from the anti-static defense bag, you should first position your hand at the grounded steel object for a while (such as 10 seconds) to release the static electrical energy in your body and hands;4, when taking the board card, need to wear electrostatic protecting gloves, and will grow the behavior of only touching the sting part;5 In order to circumvent the human physique being stunned or the product being damaged, the AC strength supply should be grew to become off first when the board is unplugged or reconfigured;6, before moving the board or the entire machine, the AC power delivery needs to be became off;7, for the whole product, need to broaden or minimize the board, be sure you flip off the AC strength supply;8, once you need to join or unplug any equipment, must first turn off the AC strength supply;9 In order to bypass unnecessary damage to the product brought on by frequent switching on and off, after shutting down, you must wait at the least 30 seconds earlier than turning on


Review
0 people rated this product
Nas Motherboard Kit Xeon C612 Chip 10 SATA Cable Support E5 V3/V4 Turbo DDR4 Max 96GB PCIE Split for NAS Router 2x2.5GbE 24*24cm
Free shipping & returns
 QWQER Express,
 USPS,
USPS, DHL
DHL
Shopping security
- Safe payment options
- Secure privacy
- Secure logistics
- Purchase protection